Snippets Commands
February 20, 2023
Last updated on October 30, 2026
Snippets are bits of content that can be inserted onto a page and provide repeatable and standardized elements that make editing easier and faster. See also My Snippets to learn how to capture your own snippets for reuse.
- Boxes
- Breadcrumb
- Calendar
- Create Journal
- Divider Lines
- Emoji
- Sortable Date
- Status
- Table of Contents
- Expand/Collapse
- My Snippets
───────────────────────────────────────────────────────────────────────────────────────────────────
Boxes
Code Box
Default shortcut is F6
Inserts a code box with heading and area for your code. Use the Paste Rich Text command to paste syntax-highlighted code directly from Visual Studio. By default, text colors are based on the page background color.
To wrap content already on the page, select the content before clicking this command or pressing F6. The selected content will be wrapped inside a new code box. If the background color of all of the selected text is dark and the page background is light then the shading of the code box is set accordingly; similar if the background color of all of the selected text is light and the page
background is dark.
|
Code |
|
/// <summary> /// Close this file and release internal resources. /// </summary> protected virtual void Dispose(bool disposing) { if (disposing) { if (!isDisposed) { if (writer != null) { writer.Flush(); writer.Dispose(); writer = null; }
isDisposed = true; } } } |
If text copied from Visual Studio is pasted as plain text instead of rich text when using the Paste Rich Text command (Ctrl+Alt+V) then look at the VS Tools... Options... Text Editor... Advanced, and tick the box Copy rich text on copy/cut.
Info, Notes, and Warning Boxes
Inserts an information, Notes, or Warning box with fully customizable headers and content. These snippets are actually just nested tables.
To surround content already on the page, select the content before invoking one of these commands.
|
|
|
You can customize these boxes or create custom box types from the Snippets sheet in the Settings dialgog.
Text Box
Default shortcut is Alt + F6
Insert a single-cell table. To surround content already on the page, select the content before invoking this command. This table cell will shrink to the size of the selected content if it is not as wide as the page.
────────────────────────────────────────────────────────────────────────────────────────────────────
Below are the standard snippets provided by OneMore.
Breadcrumb
Adds a breadcrumb - location path - at the top of a page specifying its hierarchical path within the notebook. If the page is moved or the breadcrumb was deleted, rerun this command at any time to update the breadcrumb or add it again.
For example, the breadcrumb for this page is the following, where the notebook and section are independently hyperlinked.
Commands → Snippets Commands
Calendar
Inserts a monthly calendar for a selected month in either large or small format. The small format is good for a quick look at a month. The large format is good for entering brief daily notes.
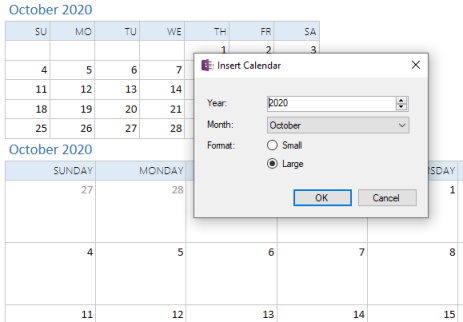
The Indent calendar option will indent the calendar beneath the header, allowing the header to be collapsed
Create Journal
Generate a set of dated journal pages for a given month. Pages can be added to the current section or a new named section for journal entries. You can choose to include or exclude pages for Saturday and Sunday. Custom hashtags can be applied to each page for easier searching later on.
Divider Lines
Double Horizontal Line
Adds a double-width horizontal line below the current paragraph
═════════════════════════
Horizontal Line
Adds a horizontal line below the current paragraph
─────────────────────────
Emoji
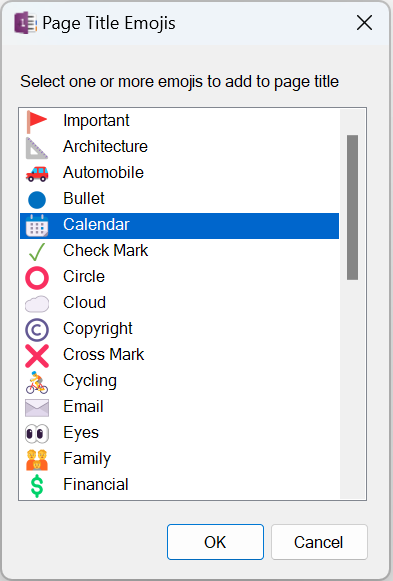
Inserts one or more selected emojis. The emojis are symbols selected from the Segoe UI Emoji font. One recommended use is to prepend your page title with an emoji, which will then show up in the page panel for quick identification.
Sortable Date
Default shortcut is Ctrl + Shift + D
Inserts the current date in the form yyyy-mm-dd. One common use case is to prefix the title of a new page with the current date so it is easy to sort and visually identify pages according to the entered date.
Status
Insert colored status labels similar to the Status macros found in Confluence. These are not as smart as the Confluence macros but instead are just simple text with a highlight background that are fully editable inline.
STATUS STATUS STATUS STATUS STATUS
───────────────────────────────────────────────────────────────────────────────────────────────────
Table of Contents
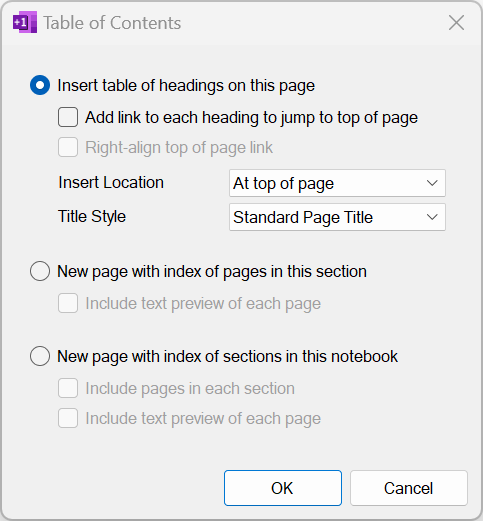
There are three separate table of contents commands
- Table of Contents of all headings on this page
- Create or update a page with links to all pages in the current section
- Create or update a page with links to all sections in the current notebook, optionally with pages in each section
The OneMore ribbon has a split button. The main part of the button opens the Table of Contents dialog. The drop-down menu gives access to the section and notebook functions.
Table of Contents (Page)
The Table of Contents command generates a table of contents based on both standard headings and custom user-defined headings where each line is hyperlinked to its heading and indented according to its heading level.

Sample output:
Table of Contents
. . Heading 2
. . . . Heading 3
Collate Table of Contents
Provides a way of created a Table of Table of Contents. This searched selected notebooks for pages with the specified hashtags and collates each page-level table of contents onto a single master index page. The individual page-level tables of content are not modified in any way; they are simply combined into one larger page, ordered by notebook/section/page hierarchy.
Table of Pages in Section and Table of Sections in Notebook
These two commands are similar in that they create or update a page, positioned as the first page in the section. The first maintains a page with a list of pages in the current section, optionally with text previews and headings on each page. The second maintains a page with a list of sections in the current notebook.
|
|
|
|


The Update page date and time is a special feature that updates the date/time stamp on each page whenever you create or refresh the listings. This can be used to "mark" the pages.
───────────────────────────────────────────────────────────────────────────────────────────────────
Expand/Collapse
Inserts a collapsible section at the current position on the page. This can be used to hide secondary or sensitive information on your page. This snippet includes a single-cell table to which you can add content.
|
|

|
═══════════════════════════════════════════════════════════════════════════════════════════════════
My Snippets
OneNote comes with pre-defined snippets described above. But you can create new snippets from your own custom content using the My Snippets commands.
Really, any bit of OneNote content can be captured as a reusable snippet, ready to be pasted into new content at any time. Snippets can also include embedded macros. As a short example, you can create a snippet that looks like this:
|
{=DATETIME(MMM dd)} - {=QUARTER} Check-in
|
The text in curly brackets are macros that get expanded when you insert the snippet. For example, that might expand into:
|
Oct 23 - Q4 Check-in
|
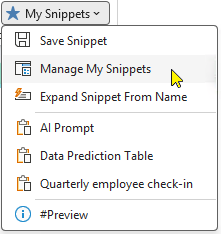
The My Snippets menu is where you can save, manage, and access snippets. Custom box types are also shown at the bottom of this menu.
Save Snippet
Saves the selected content as a custom snippet with its own name and adds it to the My Snippets menu. If the name already exists, that snippet is overwritten. This command can be used to save updates to existing snippets opened from Manage My Snippets too.
Snippets may contains special macros that are expanded when you insert the snippet. These macros must appear exactly as shown below, including the curly braces and, if necessary, an equals sign after the first curly brace. They are not case-sensitive.
|
Macro |
Is replaced with |
|
|
An auto-incrementing number stored per name, suitable for numbered meeting notes or decision logs. Named counters are stored in counters.json under your AppData\Roaming\OneMore folder, so they are global across all pages. Edit that file to change a counter or delete the file to reset all counters. |
|
|
The current clipboard text |
|
|
A formatted date/time string, where format is a valid .NET DateTime format string as described here. Additional custom formats are described here |
|
|
A countdown. Useful for project deadlines. The value must be a valid date string. This is not dynamic, meaning once inserted, that becomes static text. Insert the snippet again on a different day to see the new value. |
|
|
The date/time when the page was last modified - the time the snippet is inserted! |
|
|
The name of this page, the name of the section, and the name of the notebook |
|
|
A hyperlink to the current page, which you could paste into a summary elsewhere |
|
|
Asks you for a value for label when the snippet is inserted |
|
|
The selected content. If there is no selection then the macro is removed and left blank. Aliases for this macro include {=BODY}, {=SNIPPET_BODY}, and {SNIPPET_BODY} |
|
|
The current annual quarter, e.g. Q1 |
|
|
The ISO week number, common in planning and standups |
Here are examples of a couple of common DATETIME formats you can use.
|
Format |
Description |
Example |
|
|
Full date and time per your locale |
Saturday, October 25, 2025 8:14 AM |
|
|
Date |
25-Oct-2025 |
|
|
Long date |
October 25, 2025 |
|
|
Long time |
8:17:00 AM |
Manage My Snippets
Open the Settings dialog where you can rename, edit or delete saved snippets.
When a snippet is opened for editing, it copies the original snippet content onto a new temporary page in the current section. Select the snippet conrtent and save it, keeping the name to update the existing snippet, or provide a new name to create a new snippet. You can delete the temporary page when you are done editing.
Expand Snippet From Name
Default shortcut is Alt + F3
While you can insert a snippet from the Snippets/My Snippets menu, an alternative solution is to type the name of a snippet, select the name, and then press Alt + F3. This will immediately replace the selected name with the expanded snippet.
#omwiki #omcommands
© 2020 Steven M Cohn. All rights reserved.
Please consider a sponsorship or one-time donation to support ongoing development
Created with OneNote.